Introduction: Understanding Domain Pointing and Its Importance
The process of connecting your domain to Blogger could be a bit technical, but when you understand where to click and what to paste, it becomes fairly simple. If you are using ARZ Host and want your blog to appear more professional with a customized domain, you are half way through.
With a custom domain you can give that professional look to your blog and it is much easier to remember than the default Blogspot URL.
The trick is knowing how to work with the domain settings. It’s not exactly complicated, but there are a few things you gotta get just right. Miss one tiny detail and Blogger won’t recognize your domain. This can be annoying especially if you are not used to the DNS settings. But when done, it is one of those things that makes you feel like a little tech expert..
ARZ Host makes it easy to manage your domain, and Blogger is super flexible when it comes to connecting outside domains. The two actually complement each other quite very well. It only takes pointing the appropriate records to the appropriate places and a little patience as everything gets aligned behind the scenes.
What is Domain Pointing, and Why Does It Matter
Domain pointing is a technical word, but it is simply a matter of letting your domain know where to go. Think of your domain as an address and Blogger as the house. Unless your address is pointing to the correct location, nobody is going to find your blog, it is that simple.
When you buy a domain from ARZ Host and build your blog on Blogger, they’re not automatically connected. You have to kind of bridge the two. That’s where domain pointing comes in. You are literally saying, “Hey, when they type in mydomain.com, send them to my blog on Blogger.”
Why bother? Well, using your own domain just looks better. Clean, professional, and easy to remember. Plus, it’s yours — no blogspot in the name, no shared branding. It’s your little corner of the internet.
Remote Work Made Easy
Secure & Fast Window VPS by ARZ Host– Start for Just $18/month with Our Limited-Time Offer.
Click HerePointing a Domain to Blogger:
Before diving in, just make sure you’ve got a few things ready:
- A domain you’ve registered through ARZ Host. If you haven’t done that yet, grab one — it only takes a few minutes.
- Access to your cPanel. That’s where you’ll tweak the DNS settings. You can find it in your ARZ Host account.
- A Blogger account, obviously. You’ll need that to grab the info Blogger gives you for connecting everything.
- And a bit of patience. It takes some time before DNS changes take effect.it can be a couple of hours, or a day
Get Your Blogger Account Ready.
Before you can do any messing around with your domain settings, you are going to need to make a couple of edits in your Blogger account. It is not that complicated, just a few steps to follow.
- Sign in to Blogger: First off, go to blogger.com and sign in with your Google account. Make sure you’re using the one linked to your blog. It may seem obvious, but people mix that up more often than you’d think.
- Go to Settings: Once you’re in, choose the blog to which you want to connect the domain (if you have more than one). Then, look at the left-hand menu for Settings and click it.
- Find Publishing: Scroll down a bit until you see the Publishing section. That’s where you’ll be adding your domain.
- Click on Custom Domain: You’ll see a spot where it says “Custom domain.” Click that. It’ll open up a little input box.
- Enter Your Domain: This is important, make sure you type your domain with the “www” at the beginning, not just yourdomain.com but www.yourdomain.com. It needs that www prefix to work correctly.
- Click Save: Once you’ve entered it, hit Save. You will initially get an error message, which is normal.
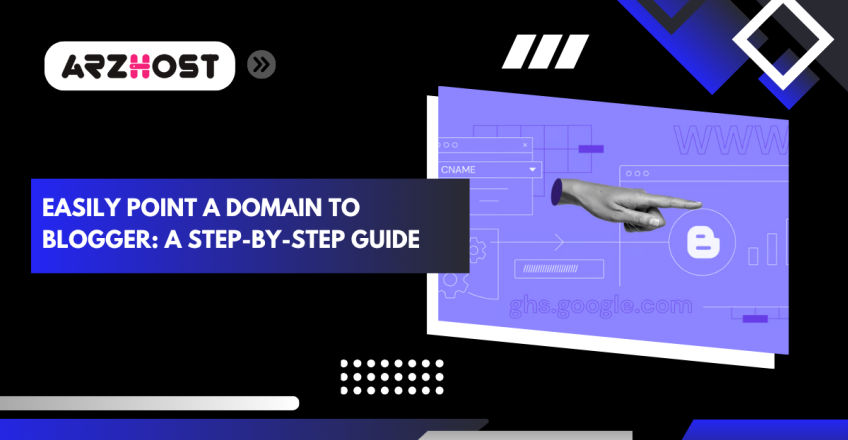
- Blogger will provide two CNAME records:
- One standard CNAME with www pointing to ghs.google.com
- A second unique CNAME for verification specific to your blog
- Copy those CNAME records: Save them somewhere you can find them again. You will add them to the DNS of your domain later on. Don’t lose them because if you do, you will have to revisit this and restart.
Log into your Control Panel
Alright, now that you’ve got the CNAME records from Blogger, it’s time to hop into your Okay, now that you have the CNAME records on Blogger, it’s time to jump into your hosting control panel and get the DNS side of steps sorted out
- Access your cPanel: Head over to the Log In of Your Client Area. After doing this, find a button or a link that says something like cPanel; click it. It would load after a couple of seconds depending on your connection, and that is no big deal.
- Scroll down to the Domains section. You will see all sorts of stuff in cPanel, do not get overwhelmed. Simply scroll down and you would notice the area marked Domains. That’s the one you need.
- Open the Zone Editor: In the Domains section, there should be something called Zone Editor. Click that. This is where you’ll be adding those CNAME records Blogger gave you.
Add Required CNAME Records
Okay, now that you’re in the Zone Editor, it’s time to Add and Manage those CNAME Records Blogger gave you earlier. These records basically tell your domain where to point so it shows your blog. It doesn’t take long.
Add the first (standard) CNAME record.
- Click on “Add Record” or something similar (it depends on how your cPanel is set up).
- For the Name, type www
- For the Value or Destination, enter ghs.google.com
- You should not change the TTL unless you are sure of what you are doing (most people leave it alone)..
Add the second (unique) CNAME record from Blogger.
- Now add a second CNAME. This one’s a bit more specific to your blog. You should’ve copied it earlier from Blogger—if not, go back and grab it.
- The Name will look something like r2b6zengztjs (yours will be different)
- And the Value might be like: gv-abcdefg.googlehosted.com
- Again, just paste what Blogger gave you.
Save your changes
Once both records are added, make sure you click Save or Add Record—whatever button shows up. Some cPanels save automatically, but it’s still good to double-check.
Add A Records to Point Domain to Google IPs: Configuring Redirection
Some A records are required so that your site loads without the prefix of www, e.g.,just yourdomain.com. It is essentially telling your domain where to find it when someone enters that into their search.
- You’re still in the Zone Editor, right? Click “Add Record,” and this time, you’re going to add A records, not CNAMEs.
- Here are the four IPs you need to use — just add them one at a time:
- 216.239.32.21
- 216.239.34.21
- 216.239.36.21
- 216.239.38.21
- They all go to Google’s servers behind Blogger, so don’t worry about what they are precisely. Just plug them in.
- For the Name field (some cPanels call it Host or something similar), just type @. That’s a shortcut that means the base domain — so, like, without the www.
- In case there is an issue with using @, you can simply leave it out and use your domain name, such as yourdomain.com.
- After each one is created, select the Save or Add Record button. When you are repeating the same thing a couple of times, it becomes easy to forget.

Wait for DNS Propagation
Here is the part that tries your patience next. Once all the records have been added and all the stuff has been saved, you just have to wait. This is referred to as DNS propagation and it is simply the period that your changes take to reach the internet.
In some cases, it is fast; in an hour or two. However, on other occasions, it may require up to 24 or 72 hours. At the time you should not be surprised when your domain is not functioning immediately. You may write it, and have the error, or it may not go. It’s totally normal. It simply means that the changes have not taken effect.
Finalize Settings in Blogger: Completing the Configuration
Ok, you have sorted out the DNS records and all is saved in cPanel now it is time to get back to your Blogger account.
- In the left menu, you need to click on Settings, you may need to scroll down a little until you see the Publishing section.
- Under Publishing, ensure that your custom domain is showing. It must be such as www. yourdomain.com. In case it does not appear, re-add it. Ensure that it begins with www, otherwise Blogger will not accept it.
- Then you would see an option that suggests redirecting yourdomain.com to www.yourdomain.com. You’ll want to turn that on. It simply ensures that in case someone types in your domain without the prefix of www, he/she will be redirected to your blog rather than an error page. Pretty important.
- Once that is switched on, scroll down a bit and Save to fix the changes.
Troubleshooting Tips: Addressing Common Issues
Things do not necessarily always go right, and that is alright.. The following are some of the quick ways to check whether your blog is not loading on your custom domain:
- Clearing your browser cache will be the first step. It might sound simple, nevertheless, you will be surprised by how often your browser will show you the outdated version of the site. Refresh and wait.
- Go back to your DNS settings in cPanel and verify everything. Examine the CNAME records and A records you have added. One little mistake; such as an omitted comma or a superfluous space has the ability to trip it up.
- When you have waited several hours and it is still not functioning, you could consider contacting the support at ARZ Host. Occasionally, DNS changes do not apply properly on the server side, and they can assist in straightening that out.
- In Blogger too, when you are receiving an error along the lines of domain ownership, it typically indicates that one of the CNAME records is not correct.
Take Your WordPress Site to New Heights
Optimized for WordPress—Get Your Hosting Plan at just $0.99/month.
Click HereConclusion: Best Practices for Seamless Domain Integration with Blogger
Switching your domain ARZ Host to your Blogger blog with the help of cPanel is not very complex, yet it is necessary to go through the steps carefully. And once it is configured in the proper manner, it definitely adds that extra professionalism to your blog and is a big plus in your branding also.
The most important thing is to include those CNAME and A records as they are provided by Blogger. Check them twice before you save anything. A single misplaced letter or figure is enough to put things off. And if you want people to land on the right page regardless of what they type, do not forget to redirect the version without the www to the version with it. The one is optional, though, it makes things just easier in general.
When that is all settled, take some time. The Internet is not fast in DNS matters, it may take days or even days. Wait, refresh and recheck later.
When you have done this, your custom domain should work without issues. As soon as it is live, you will have a cleaner and easy to remember web address. Not to mention that search engines also prefer such an arrangement, which is a nice bonus, too.
FAQs (Frequently Asked Questions)
What are the common mistakes when configuring domain records?
A typo in the CNAME or A records is one of the most frequent ones, even a dot or a single space can cause everything to go wrong. You can also ensure that you are not copying entries or exchanging the hostnames. And do not forget to save changes after updating. It sounds obvious, but it happens.
Can I connect multiple domains to the same Blogger blog?
Not really. Blogger only supports one custom domain per blog. You can’t point two different domains to the same blog directly. What you can do is set up a redirect from one domain to the other through your hosting or domain provider, but that’s more of a workaround.
Can I use a subdomain, rather than the main domain, to my Blogger blog?
Yes, absolutely. It is just fine to have something like blog.yourdomain.com when you would prefer to keep your main domain to do something. All you need to do is to create the appropriate DNS record in cPanel and to input the subdomain in the settings in Blogger (omitting the “www” in that instance).
What can I do when my domain is not redirecting properly to Blogger?
To begin with, wait a few hours; DNS does not work immediately. Still not working, recheck your DNS records. Look closely at the values Blogger gave you and make sure they match exactly in your cPanel. Also, make sure the redirect option in Blogger settings is turned on. In case everything seems fine and it continues to act out, contact ARZ Host support.
How to make sure that the redirect works properly?
Set it up correctly. If you’ve added the correct A records and turned on the redirect from non-www to www in Blogger, it should just work. Clearing your browser cache can help when testing it, too — sometimes, your device just needs a little push to load the updated info.
What are the benefits of enabling the non-www to www redirect in Blogger?
It’s mainly about consistency and user experience. Some people type your domain with “www,” and some do not. If that redirects off, one of those versions might not work — or worse, show an error. Enabling it means no matter what they type, everyone ends up in the same place. It’s also better for SEO.
Read More: