Introduction: Why Saving Audio Messages on iPhone Matters
Audio messages have become an increasingly popular way to communicate, offering a personal touch that text messages lack.
Whether it’s a heartfelt message from a loved one or an important voice note from a colleague, you might want to save these audio messages for future reference.
Fortunately, your iPhone allows you to do just that, but the process may not be immediately obvious.
This guide will walk you through the steps to Save Audio Messages on your iPhone, ensuring that you can keep your important messages safe and accessible.
For more tips and resources, check out our Resources at ARZ Host. Let’s get started!
Why Do We Save Audio Messages on iPhone?
Saving an audio message on an iPhone can be important for several reasons:
- Preserving Important Information: Audio messages often contain valuable information, such as reminders, directions, or important updates. Saving them ensures you can reference this information later without relying on memory.
- Sentimental Value: Sometimes, audio messages from loved ones carry sentimental value. Saving these messages allows you to keep and revisit those memories whenever you want.
- Proof of Communication: In certain situations, having a record of a conversation can be crucial, whether for personal reasons or in professional contexts. Saved audio messages can serve as proof of communication.
- Convenience: Saving an audio message allows you to easily access it later without having to ask the sender to resend it. This is especially useful if the message contains details you need to refer to multiple times.
- Legal or Professional Use: In some cases, audio messages may be needed as evidence or for legal purposes. Saving them ensures you have a reliable record that can be used if needed.
Overall, saving an audio message on an iPhone helps ensure that important, sentimental, or legally significant communications are not lost.
How to Save an Audio Message on an iPhone? 5 Easy Steps
Saving an audio message on an iPhone is straightforward. Follow these five easy steps to ensure you don’t lose important voice memos or messages.
Whether it’s a cherished memory or vital information, you can keep your audio messages stored safely for future access.
1: Open the Messages App
To begin saving an audio message, first, open the Messages app on your iPhone. The Messages app is represented by a green speech bubble icon and is typically located on your home screen or in the app drawer. Tap the icon to launch the app.
Once inside the Messages app, you’ll see a list of conversations you’ve had with different contacts. This is where all your text and audio messages are stored. If you don’t see the Messages app on your home screen, you can quickly find it by swiping down from the middle of your screen and typing “Messages” into the search bar that appears at the top.
After opening the Messages app, make sure you’re connected to the internet if the audio message you want to save was sent via iMessage. This will ensure the message is fully downloaded and ready to be saved.
2: Find the Conversation Containing the Audio Message
Next, find the conversation containing the audio message you want to save. Scroll through your list of conversations until you locate the correct one. The list is organized chronologically, with the most recent conversations at the top. If you have many conversations, you can use the search bar at the top of the screen to quickly locate the specific chat.
Tap on the conversation to open it. Inside the conversation, you’ll see a history of messages exchanged between you and your contact, including text, images, and audio messages. Scroll through the conversation history if necessary to find the audio message you wish to save.
If the conversation contains multiple audio messages, take note of the timestamp or the surrounding context to identify the exact message you’re looking for. This will help you ensure that you’re saving the correct audio clip.
If you having an issue saying Mail Certificate not trusted, check out our guide on iPhone Mail Certificate Not Trusted: How to Fix It.
3: Play the Audio Message
Before saving the audio message, you may want to play it to ensure it’s the correct one. To do this, simply tap on the play button (a sideways triangle) located next to the audio message. The message will start playing through your iPhone’s speaker or connected headphones.
As the audio message plays, you can adjust the volume using the volume buttons on the side of your iPhone. If you need to replay the message, just tap the play button again.
Listening to the message before saving it is a good idea, especially if there are multiple audio messages in the conversation, as it helps confirm that you’re saving the right one.
Once you’re certain that this is the audio message you want to keep, you can move on to the next step to save it.
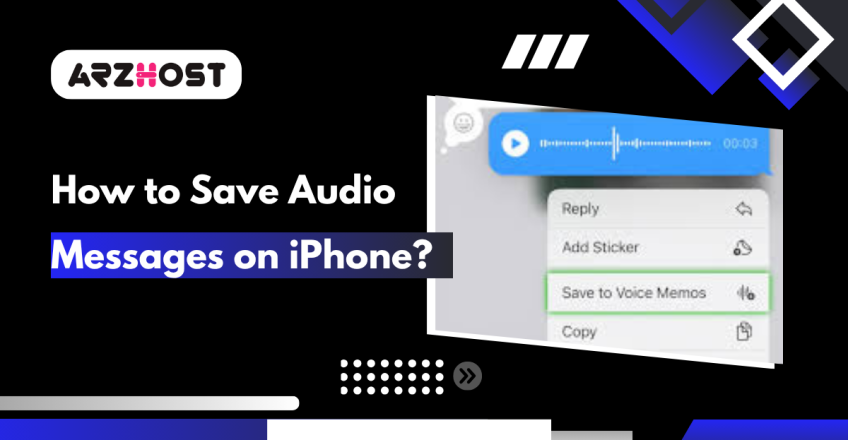
4: Save the Audio Message
To save the audio message, press and hold on to the audio clip until a menu appears with several options. Among these options, you should see one labeled “Save.” Tap on “Save,” and the audio message will be stored in your Voice Memos app or your Files app, depending on your iPhone’s settings and the version of iOS you’re using.
If you don’t see the “Save” option, your iPhone may be set to automatically save audio messages. In this case, the message might already be stored in your Voice Memos app. You can check your iPhone’s settings to adjust how audio messages are saved.
Saving audio messages is particularly useful when you want to keep a record of important voice notes or memories shared through iMessage. Once saved, these messages are accessible even if the original conversation is deleted.
5: Access Saved Audio Messages
After saving the audio message, you can access it anytime through the Voice Memos app or the Files app, depending on where it was saved. To find your saved audio message in Voice Memos, open the app from your home screen or app drawer.
The saved message will appear in the list of recordings, usually named after the contact who sent it or labeled with the date and time of receipt.
If the audio message was saved in the Files app, open Files and navigate to the folder where the message was stored. If you’re unsure where it was saved, use the search bar within the Files app to locate it quickly.
Accessing your saved audio messages is simple, and you can play, share, or delete them as needed. These saved messages remain available even if the original conversation in the Messages app is deleted, ensuring that you always have a copy of important voice communications.
For more troubleshooting tips, check out our guide on How to Fix Recipient Was Rejected by the Server on iPhone.
Effective Tips for Managing Audio Messages
1: Changing the Expiry Settings for Audio Messages
If you frequently receive audio messages and want to keep them all without manually saving each one, you can change the expiration settings:
- Go to Settings: Open the Settings app on your iPhone.
- Navigate to Messages: Scroll down and tap on Messages.
- Adjust Expire Settings: Under the Audio Messages section, tap on “Expire”. Change the setting from “After 2 Minutes” to “Never”. This change ensures that all audio messages you receive are kept by default unless you delete them manually.
2: Backing Up Audio Messages
To ensure your audio messages are always safe, consider backing up your iPhone to iCloud or your computer. This way, even if you lose your device or need to restore it, your saved audio messages will remain intact.
Conclusion: Making the Most of Saved Audio Messages
Saving audio messages on an iPhone is a straightforward process once you know the steps. Whether you choose to keep the message within the Messages app or save it to another location, this guide provides all the information you need to preserve those important voice notes and cherished memories.
By following the steps outlined above, you can ensure that your audio messages are easily accessible whenever you need them.
Now that you know how to save audio messages, you can keep those special moments and important information safe with just a few taps on your iPhone.
For more tips on managing your digital life and resources on optimizing your web hosting experience, visit ARZ Host.
FAQs (Frequently Asked Questions)
1: How can I save an audio message from iMessage on my iPhone?
To save an audio message from iMessage on your iPhone, follow these steps:
Step 1: Open the Messages app and locate the conversation containing the audio message you want to save.
Step 2: Press and hold the audio message bubble until a menu appears.
Step 3: Tap “More…” from the menu options.
Step 4: Select the share icon (a square with an upward arrow) at the bottom left of the screen.
Step 5: Choose “Save to Files” or “Save to Notes” to store the audio message on your iPhone.
- If you choose “Save to Files,” you can select a folder in iCloud Drive or on your iPhone’s local storage.
- If you choose “Save to Notes,” the audio message will be stored in the Notes app, where you can access it later.
2: Can I save audio messages from WhatsApp on my iPhone?
Yes, you can save audio messages from WhatsApp on your iPhone. Here’s how:
- Open the WhatsApp conversation containing the audio message.
- Tap and hold the audio message you want to save.
- A menu will appear. Tap “Forward” from the options.
- Tap the share icon at the bottom left of the screen.
- Choose “Save to Files” or “Save to Notes” to store the audio message on your iPhone.
3: Where are saved audio messages stored on my iPhone?
When you save an audio message on your iPhone, it is stored in the location you choose during the saving process. The two common options are:
- Files App: If you select “Save to Files,” the audio message will be stored in the Files app under the folder you specified, such as “On My iPhone” or in a specific iCloud Drive folder.
- Notes App: If you choose “Save to Notes,” the audio message will be embedded in a note, and you can find it in the Notes app. Simply open the note where you saved the audio, and tap on the embedded audio file to listen to it.
4: How do I save an audio message from the Voice Memos app on my iPhone?
If you want to save an audio message from the Voice Memos app, follow these steps:
- Open the Voice Memos app and locate the memo you want to save.
- Tap on the audio memo to open it.
- Tap the three dots (more options) icon.
- Select “Save to Files” from the menu.
- Choose a folder in the Files app or iCloud Drive to save the audio message.
This allows you to access the audio message from the Files app whenever you need it.
5: Can I share a saved audio message from my iPhone with others?
Yes, you can easily share a saved audio message from your iPhone with others. Here’s how:
- Locate the saved audio message in the Files or Notes app, depending on where you saved it.
- Tap and hold the audio file until a menu appears.
- Select “Share” from the options.
- Choose the method you want to use for sharing, such as Messages, Mail, Airdrop, or another app.
- Complete the sharing process by selecting the contact or app you want to send the audio message to.
This allows you to share the audio file with friends, family, or colleagues directly from your iPhone.
Read More: