Different methods to speed up websites Leveraging Browser Caching, If you want to leverage your browsing cache, you need to define for how long web browsers keep images and data that CSS & JS stored locally on the client’s browser. Using browser cache, the user’s browser will take less time as well as less data while browsing through the website. The leverage browser caches mean to speed up your word press website loading time. The websites that take less time in loading can be ranked up easily.
What is Leverage Browser Caching?
Before we discuss the main points and tell you how to implement different methods, you need to know what is the leverage browser caching in WordPress means & how it works. Once we explain how the process works you can understand its benefits.
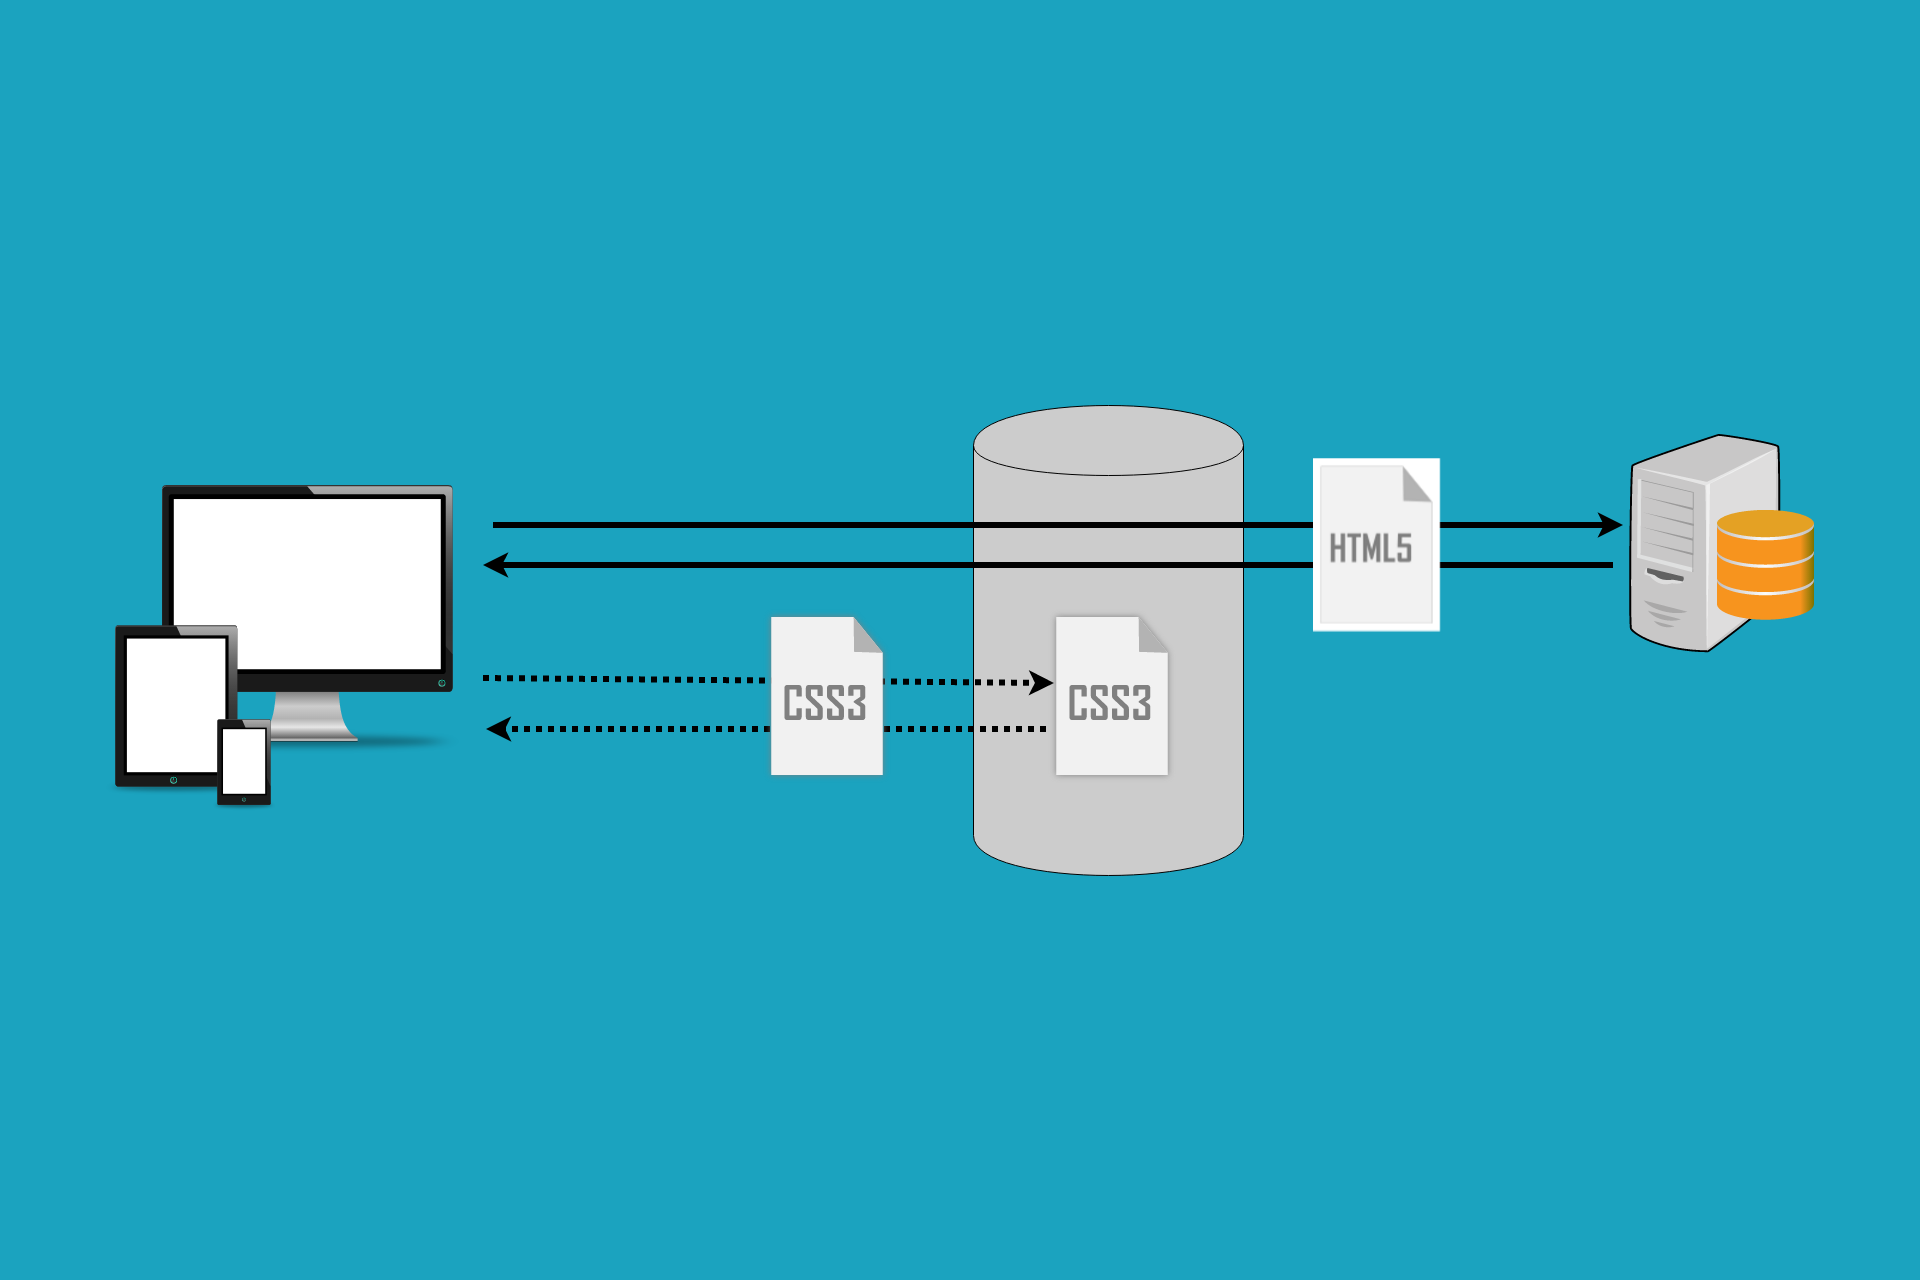
When a person visits a page, the browser needs to download all the resources including images, gifs, videos, HTML, CSS & JS on that domain from the server. If someone visits the same website every day with different pages, the browser needs to download all the resource files again and again. To stop repeating this process, the browser uses a web cache. This is a special feature that all browsers used to temporarily store web page assets on the device’s local cache. This data or storage is called HTTP Cache or web Cache.
Following is the image that explains how a web cache works:

By using the web cache, not only is the load on the server reduced but also bandwidth consumption reduces.
Following are some methods to leverage browser caching
Method 1: (Leverage Browser caching using .htaccess)
Follow the following instructions step by step for good results.
- The first step is to the Cpanel of your website hosting account
- Now Go to the root folder of the website that needs changes
- Open the .htaccess file with the file editor. In case, if you can’t find the .htaccess file check the hidden files settings as the .htaccess file is hidden by default.
- The given code is to the bottom of the .htaccess file.
- Add expiry header with a maximum expiry time
- Cache-control headers in the .htaccess file
- Unset ETag headers
- Without making any other changes simply save the file
- Test the applied changes on your website.
A slight modification in the .htaccess file requires setting up the expiry time of Images and CSS files. These settings are found at the root of the hosting server. To boost your website performances change the expiry headers values.
#Customize expires cache start - adjust the period according to your needs
<IfModule mod_expires.c>
  FileETag MTime Size
  AddOutputFilterByType DEFLATE text/plain text/html text/xml text/css application/xml application/xhtml+xml application/rss+xml application/javascript application/x-javascript
  ExpiresActive On
  ExpiresByType text/html "access 600 seconds"
  ExpiresByType application/xhtml+xml "access 600 seconds"
  ExpiresByType text/css "access 1 month"
  ExpiresByType text/javascript "access 1 month"
  ExpiresByType text/x-javascript "access 1 month"
  ExpiresByType application/javascript "access 1 month"
  ExpiresByType application/x-javascript "access 1 month"
  ExpiresByType application/x-shockwave-flash "access 1 month"
  ExpiresByType application/pdf "access 1 month"
  ExpiresByType image/x-icon "access 1 year"
  ExpiresByType image/jpg "access 1 year"
  ExpiresByType image/jpeg "access 1 year"
  ExpiresByType image/png "access 1 year"
  ExpiresByType image/gif "access 1 year"
  ExpiresDefault "access 1 month"
</IfModule>
#Expires cache end
According to the above settings, the HTML of your website page expires after 600 seconds. You can also set CSS and JS settings to expire once a month. It means if a user visits your website within a month, they don’t need to redownload CSS and JS assets again. You can set this expiry date up to 1 year, in case there are no more changes that can be done within a year on your website.
This is one of the most effective ways to leverage browser caching for not only WordPress websites but also for other frameworks.
Set Image files to the maximum expiry time
Set the image expiry time for more than one year for better results.
Add cache-control Headers
Add the following code in the file to set the cache-control headers.

Code:
# BEGIN Cache-Control Headers
<IfModule mod_expires.c>
  <IfModule mod_headers.c>
    <filesMatch "\.(ico|jpe?g|png|gif|swf)$">
      Header append Cache-Control "public"
    </filesMatch>
    <filesMatch "\.(css)$">
      Header append Cache-Control "public"
    </filesMatch>
    <filesMatch "\.(js)$">
      Header append Cache-Control "private"
    </filesMatch>
    <filesMatch "\.(x?html?|php)$">
      Header append Cache-Control "private, must-revalidate"
    </filesMatch>
  </IfModule>
</IfModule>
We already set the expiry dates in the code so you don’t have to add extra work.
Unset Etag header
The final step that is needed to be done is to unset Etags settings. As Etags are no longer necessary you simply need to unset them. Add the following code in the .htaccess file to unset them.
Code:
# Disable ETags
<IfModule mod_headers.c>
	Header unset ETag
</IfModule>
FileETag None
Method 2: (Leverage browser caching WordPress using plugins)
There are different plugins available that can be used for caching such as WP Rocket, W3 total cache, and WP fastest cache.
Leverage Browsing Caching:
If you are looking for easy methods to leverage browser caching in word press websites, you came to the right place. Follow the following steps and let the magic work.
- Download the leverage browser caching plug-in from word press official website.
- Go to the dashboard of your WordPress website and then visit add new option from plugins e.g: Dashboard > plugins > Add New
- Upload the downloaded leverage browser caching plug-in from the computer
- Click Install Now
- Activate the plug-in and see the magic.
This is one of the easiest ways to speed up your WordPress website speed. It involves very little effort of yours and is highly recommended by Google.
WP Rocket WordPress Plugin:
WP Rocket is one of the fastest and most recommended plug-ins for WordPress websites. With the help of a few clicks, you can handle all your speed optimizations. It has the following features.
- File cache: enable the file cache to put fewer loads on the server.
- Lazy loading: when the user scrolls down, Images are only loaded where the images are required.
- Static file compression (GZip): It is used to make the total size of the data smaller.
- Google font optimization: this feature loads heavier fonts quickly.
- Defer JS loading: pages load faster instead of waiting for assets to download
- DNS prefetching: reduces the time to resolve the sources of 3rd party content
- Minification & combination: Shrinking the file sizes and combining the text assets to deliver them faster
- Integrates & enables a CDN: a feature that helps heavier media to deliver faster
All the above features sound like gibberish to those who don’t know the power of cache. In reality, these superb features help to make your website load faster.
One of the best things about using this plug-in is that you don’t need to configure it.
W3 Total Cache WordPress Plugin:
This is the most popular plug-in. The only problem is, that it needs all configurations. One needs to understand WordPress to configure its settings.
Conclusion:
Above are some methods mentioned Different methods to speed up websites leveraging Browser Caching. If you are interested in making your website faster, apply one of these methods for better results. Good luck


