The Linux software fsck (File System Consistency Check) checks file systems for mistakes or unresolved problems. The program is used to provide reports and correct potential problems. Let’s see the solution to this question What Must You do to Successfully Run the fsck Command on a File System?
Linux distributions by default include this tool. There are no set procedures or installation requirements to utilize fsck. Once the terminal has loaded, you are prepared to use the tool’s features.
To inspect and repair the file system on a Linux machine, refer to this instruction. Examples of how to use the tool and for what use cases are provided in the tutorial.
- UNIX-like or Linux-based system
- Access to a command line or terminal
- A root-permissions user who can use the tool
When to Use Linux’s Fsck?
The fsck utility can be applied in a variety of circumstances:
- Run a file system check using fsck to maintain your system’s integrity or when a problem arises.
- When the machine cannot boot, fsck can diagnose this as a common issue.
- Another is when your system’s files become corrupt and you have an input/output problem.
- The fsck software can also be used to examine the condition of external media, including USB flash drives and SD cards.
Primary Fsck Syntax
“What Must You do to Successfully Run the fsck Command on a File System?” The fsck utility’s fundamental syntax follows this structure:
filesystem options fsck
In the above-mentioned illustration, a filesystem could be a mount point, a partition, a device, etc. At the end of the command, you can also use filesystem-specific parameters.
How to Examine and Fix the Filesystem?
Before you inspect and fix your file system, there are a few things you need to do. Find the device, then unmount it.
1: View Mounted Partitions and Disks
Use one of the available tools in Linux to inspect all mounted devices on your system and find the location of the disc.
Listing the filesystem discs with the df command is one way to find the disc you wish to scan:
df -h
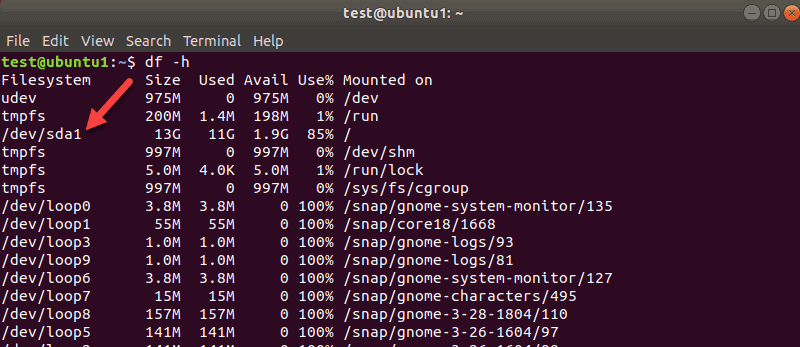
The utility outputs your system’s and filesystem’s data use. Make a note of the disc that you want to use the fsck command to verify.
Use the following command, for instance, to inspect partitions on your first disc:
'print' with sudo parted /dev/sda
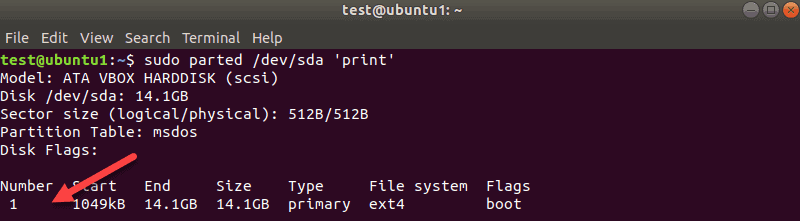
Your first SCSI disc is referred to in Linux as sda. The second would be sdb if you had two, and so on.
Since there was only one partition on this virtual system, we only obtained one result in our experiment. If you have more partitions, you will obtain more results.
Here, the disk’s name is /dev/sda, and the Number column displays the number of partitions. It is one in our case: sda1.
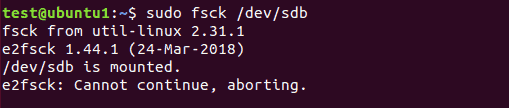
2: Drop the Disk
You must unmount a disc or partition before using fsck to perform a disc check. A warning may appear if you attempt to perform fsck on a mounted disc or partition:
Run the unmount command, and then:
Umount /dev/sdb with sudo.
Put the device you want to unmount in lieu of /dev/sdb.
Root filesystems cannot be unmounted, it should be noted. Thus, fsck can no longer be used on a machine that is running. More about that is discussed at the end of the manual.
3: To check for errors, run fsck.
You can now execute fsck after unmounting the disc. Enter this to examine the second disc:
- fsck /dev/sdb with sudo

The output for a clean disc is shown in the example above. If your disc has several problems, a prompt asking for your confirmation will show for each one.
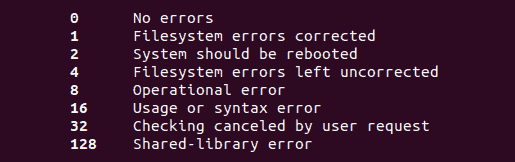
The total of these states is the exit code that the fsck utility returns:
4: Install the Disc
Mount the disc so you can use it again when you’ve finished inspecting and fixing a device.
In this instance, the sdb disc will be remounted:
install /dev/sdb
5: Run fsck in a dry run.
You can do a test check using fsck before performing a live check. To run a test, provide the fsck command the -N option:
fsck -N /dev/sdb with sudo
The output does not take any actions; instead, it prints what might occur.
6: Automatically Correct Detected Errors with fsck
Pass the -y option to fsck to run potential fixes without receiving any prompts:
fsck -y /dev/sdb with sudo
In this manner, you can respond “yes, try to remedy all discovered faults” without always being reminded.
The output seems the same as it would without the -y option if there are no errors.
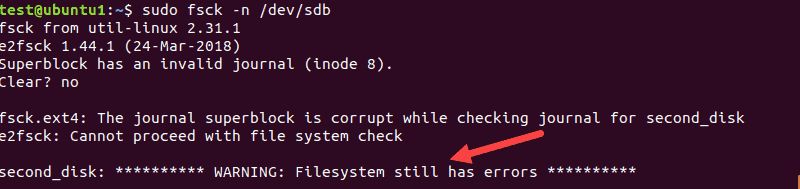
7: Skip Repair and Output fsck Errors Instead
If you wish to examine potential file system errors without fixing them, use the -n option.
We have some journaling issues on the second drive, sdb. The -n flag displays the problem but does not correct it:
fsck -n /dev/sdb with sudo
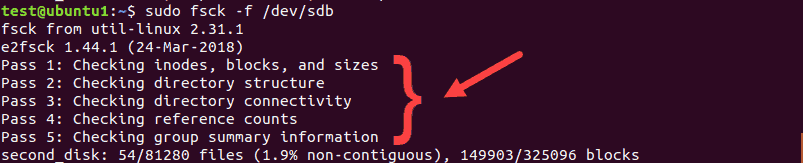
8: Force a filesystem check with fsck
The program bypasses the filesystem check when you run fsck on a clean device. Use the -f option if you wish to force the filesystem check.
For instance:
fsck -f /dev/sdb with sudo
What Must You do to Successfully Run the fsck Command on a File System? Even if the scan concludes that there are no problems, it will still run all five checks to look for corruption.
9: Run fsck once on all filesystems
Pass the -A parameter to fsck if you wish to do a check on all filesystems at once. With this selection, the, etc/fstab file will be read through once.
Add the -R option to skip root filesystems since they can’t be unmounted on a running machine:
-AR fsck
Add the -y option we discussed to get rid of the prompts.
10: On a Specific Filesystem, skip fsck
You must put -t and “no” before a filesystem if you want fsck to omit to check it.
Run this command, for example, to skip the ext3 filesystem:
Doing "sudo fsck -AR -t noext3 -y"
To avoid the prompts, we added -y.
11: On mounted filesystems, omit Fsck
Add the -M option to prevent attempting to run fsck on a mounted filesystem. The fsck utility will skip any mounted filesystems if it receives this flag.
We will run fsck on sdb both when it is mounted and when it is unmounted to demonstrate the differences:
fsck -M /dev/sdb with sudo
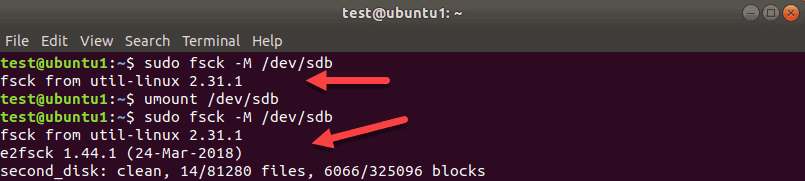
The tool terminates when sdb is mounted without performing a check. We then unmount sdb and issue the same command once more. This time, fsck examines the disc and determines if it is clean or has errors.
On the Linux Root Partition, Run Fsck
As we already mentioned, because they are mounted and being used, root partitions on a running machine cannot be checked by fsck. However, if you boot into recovery mode and do the fsck check, even the Linux root partitions can be examined:
1: To achieve this, start or restart your computer using the GUI or the terminal:
sudo restart
2: During boot-up, hold down the shift key. The menu for GNU GRUB appears.
3: For Ubuntu, choose Advanced options.
4: After that, choose the option marked (recovery mode) at the conclusion. Let the Recovery Menu load on the computer.
5: From the menu, choose fsck.
6: Select the option when prompted.
7: To restart the computer after finishing, choose resume from the recovery menu.
Conclusion
What Must You do to Successfully Run the fsck Command on a File System? You now understand how to inspect and repair filesystems using the Linux command fsck. Examples of the tool’s capabilities and features were presented in the handbook.
Before executing the instructions listed, make sure you have root permissions. Visit the fsck Linux man page or the tool’s man file for a thorough explanation of all the options.
Read More: